Thursday, December 12, 2013

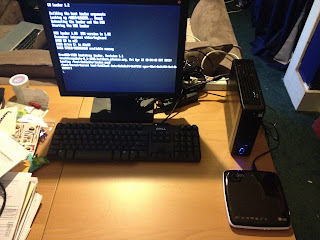
Dell T110 II Review - The perfect home ESXi, XEN, or GNS3 lab server

I have been slowly paring down the gear I have at home. Like many admins, I just want something simple that just works. I play with the big equipment at work and I don't need a power sucking dual 12 core/256gb ram box at home just to load the latest hypervisor and server OS on to play with. I recently came across a deal for a $249 Dell T110 II server and could not pass it up. It's the perfect lab box and here's why:

1) It's a normal tower form factor. It can easily sit under or on your desk and not be in the way.
2) It's powerful. A simple processor upgrade on my low end sale-model Celeron G550 to a e3-1220v2 makes this a quad-core work horse. Same goes for the ram. It supports up to 32GB of DRR3 ECC.
3) It's quiet. I have it sitting under my desk and can't hear it over my HP micro server.
4) It's well built; the case material feels solid, the internal layout gives plenty of working room, there are two internal USB headers on the motherboard for thumb drives , and it has plenty of PCI-E express slots to add additional network adaptors or a raid controller.
5) It has IPMI or Remote management.
6) It barely sips power. With the latest gen Intel Xeon, 32GB of ram, four hard drives (two SSD/two spindle), and a Intel Pro 1000 PT Quad port NIC, I'm barely drawing 46 watts at idle with half a dozen VM's spooled up. That's nothing! My HP N54l Microserver draws the same amount of power with 6 spindle drives and 1/10th the processing power.
7) It will run anything. Xen, ESXi, Linux, Windows, GN3, it does not matter- it has great driver support. You can add up to 18 NIC ports with 6 port PCI-E nics. You can fill it full of hard drives, install OMNI/ESXi and turn it in to a micro Napp-it all-in-one appliance on the cheap.
8) It has business support. I "loathe" Dell's home support. Business class has always been top notch.


So what's it missing?
First off, I have to knock a solid point off for it having a SINGLE NIC. Really Dell? Even my whitebox Supermicro gear has three (one dedicated IPMI and two gigabit nics). There's plenty of room to add additional though.
Second, and this is more my fault for not spending the extra $20, but it only has four hard drive bays. It would make a great FreeNas/Omni ZFS box if it had 6 + the two 3.5" bays.
Third, the bios is straight out of the 90's. It's just like every other server motherboard thought, so I can't really complain. Having the power state options not be under the power settings menu and instead have it hidden under something completely unrelated is just unnecessarily confusing.
Fourth and finally, it lacks USB 3.0- this can be fixed via addon card, but by the time I add this, an additional NIC, ram, hdd's, and processor- I'm close to $1k in to this box.

It's still a killer little box and one that I hope will last me for years to come. I love the tool-less hard drive trays and that they even included the correct length SATA cables for all four HDD's. The power supply is pretty low rated, but unless you are tossing a dozen spindle drives in here and maxing everything out,  I can't see it being a problem. I'm not sure why they still include a DVD rom, I personally would rather have more hard drive bays or save the $10 it costs to add in. This deal pops up every year it seams and similar ones throughout the year. Sure it may be $289 next time, but I would buy another if I had a need for a second lab box.


(Air ducting removed for photo.)

Monday, November 11, 2013

Cisco IPSEC site-to-site VPN connected but not passing traffic- solution

 Last week at work we finished up a major storage system upgrade. Two days later, our site-to-site VPN started to act up. Coincidence? I figured it was the construction and flood of trucks from the local provider in the area lately, and put it off until Monday. No users were complaining and I was working remotely Friday (the Anyconnect VPN was stable) and could access both sites just fine. After more testing, I realized I could ping site A router to site B router and site B to site A, I quickly realized there was nothing wrong with the physical fiber link between the sites. Logging out/ restarting the VPN allowed the connection to work for a short period of time, and the only downtime the ASA logged was when I reset the VPN or restarted the adapter. The tunnel otherwise would stay up. Some quick Google'ing returned this:


http://networkengineering.stackexchange.com/questions/2155/site-to-site-vpn-tunnel-up-not-passing-traffic

Our setup has the exact same issue: The tunnel stayed alive, but no traffic would pass. A quick look at the crypto security-association lifetime and kilobytes showed that we had a 8 hour and 4.5GB transfer cap. Our site-to-site fiber line can do 18.5GB in~ 1 hour on a congested day.  It appears as though our new storage system upgrade, which included site-to-site replication, was maxing out the security-association lifetime. Changing this to 8.6.5 fixes the problem, but so does increasing the kilobytes threshold. Changing ours to just over the peak transfer rate should prevent this from happening again until I can schedule downtime to upgrade the firmware. So far it has returned to its normal state and we can resume the replication.


Best of luck!
- Marc

Wednesday, August 14, 2013

Using a Raspberry Pi for a Nagios display

When I heard about the Raspberry Pi being released, I preordered waaaaay to many. My house has two for XBMC and a third for a side project. I gave one away and used the last here at work. People ask quite a few questions when they see it, so here is the setup.


Our Pi is just browsing two websites, Cacti's weathermap and Nagvis's picture- hostesd off the Nagios server.

Hardware:
Raspberry Pi Model B 512MB
4GB SD card
Wall-wort charger
HDMI cable
Any 1080p TV of your choice

http://www.cacti.net/
http://www.nagvis.org/

It's low power and small footprint make it ideal for this task. I'm hoping to move our kitchen computer over too.

Let me know if you have any questions!


Friday, June 21, 2013

IOMETER not showing all physical drives

I started to benchmark a new SSD only test SAN at work this week and after running several tests configuered in a RAID setup, I wanted to test the physical raw drives themselves. After deleting the partitions, I could not get the disks to show in IOMETER. The general solution to this is to run IOMETER as administrator under S2K8R2. This did not work for me, as the drives still had some partition reminants from the RAID. The solution: Use diskpart to clean the drives.

1) Open an Administrative CMD prompt- (right click CMD- run as administrator)

2) # diskpart

3) # select disk 1

4) # clean

Repeat until all the disks you want to test are clean. DO NOT CLEAN YOUR OS DISK.

5) # exit

Make sure IOMETER is being ran as administrator and all your disks should now show. Good luck!

Marc

Tuesday, June 11, 2013

Flashing IT firmware on a LSI 9211-8i HBA from a USB stick

Recently I needed to test different firmware versions on some LSI 9211-8i PCI-E 8x SAS 6Gbps HBA's for work. Updating the firmware seemed like a momentus pain afer reviewing the plethra of guides online. Here is my simplifyed version:

Step 1: Download the HP Flash Utility and MS-DOS system files

LINK

Step 2: Install the HP Flash Utility and extract the MS-DOS system files


Step 3: Download the latest LSI firmware: 9211_8i_Package_P16_IR_IT_Firmware_BIOS_for_MSDOS_Windows

LINK

Step 4: Extract the LSI firmware zip.

 Step 5: Follow the great guide from the link in Step 1 on Seven Forums for creating your dos bootable USB thumb drive.

Step 6: Copy the following files from the LSI firmware package to your thumb drive.

2118it.bin - Under Firmware\HBA_9211_8I_IT
sas2flsh.exe - Under sas2flash_dos_rel
mptsas2.rom - Under sasbios_rel


Step 7: Plug your USB stick into the system you are flashing the 9211-8i controller in and boot off the thumb drive.

*IMPORTANT: DO NOT TRY TO FLASH MORE THEN (1) HBA CARD AT A TIME. Remove any additional controllers and repeat the next steps. You could perminatly brick multiple cards!*

Step 8: View the installed cards using # sas2flsh -listall
(Please ignore the onboard LSI 2308 controller)
 
Step 9: Delete the existing firmware # sas2flsh -o -e 6


Step 10: Update the firmware and bios # sas2flsh -f 2118it.bin -b mptsas2.rom

 All done!

 
There, that was not too bad. You can check the update by running # sas2flsh -listall and power cycle the machine- don't forget to remove the USB stick.
 
Marc

Tuesday, May 7, 2013

ESXi All-In-One three month update + Cisco lab update

After realizing it had been weeks since I last logged in to my colocated ESXi All-In-One, I was surprised to find it still chugging along with no complaints. The Crucial M4's are still happily running and the hardware seems as solid as ever. Since this was a spare parts/ebay special/junk bin build, I never expected it to be quite as solid as it is.

Last week, I added 24x 1.5TB Seagate drives in a Supermicro 846 chassis. Hopefully I will be adding a ZIL/L2ARC cache drive here in the future to help speed up these spindles, but for now they will be setup in two RaidZ2 pools and acting as a backup for the SSD pools.


As far as the Cisco Lab update goes, I finally decided I must get off my ass and get this cert finished. My Jr. Admin has shown interest in learning Cisco and with our works recent decision to fund certifications, I can't think of a better time. This picture is a few weeks old, but it shows a majority of the gear.

(1) 881w
(1) ASA5505
(3) 1841 
(1) 2821
(1) 2621XM
(1) 1760
(1) 3640
(4) 2950 Switches
(1) 3750-48 Switch

Ideally for the CCNA I will end up with just (3) 1841 and (3) 2950's, using the 3750 as needed for some of the newer commands. Otherwise, with a few cables we should be good to start studying and doing practice labs. Can't wait. For the CCNP I will need to add at least another ASA, but that can wait for now.

Wish us luck- 
Marc


pfSense ver 2.0- Replacing the Cisco 881w with a home-made ITX system for under $200


After using a rather solid Cisco 881w for my home router the last year, I finally started looking at building a new pfSense router. The Cisco worked fine, but I missed the lower latency of the pfSense box and the familiar web interface I had used for years. I started browsing for hardware with the following requirements:

1) No fan
2) Powerful enough for a 100mb fiber line
3) Low power
4) Small form factor 
5) Under $200 new

After missing a 1u Supermicro D525 on ebay for a steal, I started browsing ALIX boards. I was mainly interested in the ALIX2D3, however after doing some research it appears to putter out around 80mb's. Next up were the latest gen Intel Atom boards- I had recently used one at work and was very impressed. However the model was ~$350 all said and done. I finally found this: 


The Intel D2500CCE. A fan-less dual core Atom running at 1.86ghz, DDR3 SO-DIMM, Dual Intel 1000mb NIC's for $99. It is very similar to the older D525- but with dual gigabit nics. For a extra $40 I added a well ventilated ITX case. Some time ago during fall cleaning at work, I scavenged a Pico 120w powersupply and brick from the junk bin which fit the bill perfectly. I could have ordered everything as a kit from www.Mini-box.com if I did not already have the power supply. I added a 4gb stick of Crucial DDR3 10600 for $19 and a used $40 Intel X25-M for a grand total of $199. 

The case and MB.
    

Motherboard installed.


Pico Powersupply.                                       


The Mini-Box M350 vented case.


Loading pfSense 2.03 RC.                 

It works!


After I burn it in for a few days, I will switch it out with the Cisco router I am currently running. Install was an absolute breeze and the entire process from assembly to running took less then 1 hour. Eventually I will dig out the Kill-A-Wall and IR thermometer to check power usage and heat output. So far it is running warm to the touch, but this summer in our old non AC house will be the real test.

Until next time!

Marc


Wednesday, March 13, 2013

Multiple DHCP servers on a single VLAN- HP 5406zl Multiple IP Helper-Address

Have you ever wanted to add a second DHCP server in case the first went offline? It's a lot simpler then you think. I recently set this up for our main office, as with our aging VM hosts I did not want
to take everyone offline if we lost one of the hosts. For this we need two servers- I already had two Server 2008r2 VM's setup: AD1 and AD2. They were already configuered for split DNS. Simply add the DHCP role to the second server and setup your scopes. It is important to A) Split your scopes- they can not overlap, and B) Split your DNS- If AD1 goes offline, you loose DHCP and DNS. See the example below.
 
Example:
 
AD1-DHCP: 10.10.10.3 
         Scope: 10.10.10.50-149
         DNS1: 10.10.10.3
         DNS2: 10.10.10.4
 
AD2-DHCP: 10.10.10.4
         Scope: 10.10.10.150-250
         DNS1: 10.10.10.4
         DNS2: 10.10.10.3
 
On our HP switches, I had to configure a second IP Helper-Address:


Before:
 
Command:


Result


As with most HP switch changes, make sure to do a WR MEM and RESET- to apply your changes.
Enjoy!

Saturday, February 23, 2013

Cisco ASA 8.4 Static PAT- Can't access your external website interally?

Ah the ASA, nothing like a good headache for a Saturday night. I just setup my ASA5515-x and got my external port fordwarding setup (guide) and my interanlly hosted webserver live. It would resolve on my phone or a remote computer just fine. Locally, it would just time out. In 8.4 they removed the DNS rewriting found previously. Here is the solution.

External IP: 50.50.50.50
Internal Webserver IP: 192.168.2.30

object network Public_Server
host 50.50.50.50
 
object network Internal_Server
host 192.168.2.30
 
nat (inside,inside) source dynamic any interface destination static Public_Server Internal_Server
 
same-security-traffic permit intra-interface

Works great now!

https://supportforums.cisco.com/thread/2157443

Monday, February 4, 2013

ESXi Colo part 2: The All-In-One storage and VM host

I had to delay this post due to some projects at work- Enjoy!

After a few weeks of waiting on various parts, I finally have everything together for my ESXi colo box. I finished assembling it after the holidays and got it burnt it in. I left the major config for some downtime around the office. Of course the day I got it racked an immediate work related need for a lab environment came up. The last few days I have spent my spare time configuring the storage passthrough and setting up the All-in-One.

If you are not familiar with the concept of a All-in-One ESXi host, I suggest you check out www.napp-it.org. Gea, the creator of Napp-IT has inspired a new line of high performance, compact, All-in-One storage/VM hosts. From his background in education and small budgets, he decided to ditch the traditional SAN "network" and build redundant All-in-One Hypervisor and storage hosts.

The basic requirements/recommendations of a All-in-One are as follows:

Supermicro X8/X9 motherboard supporting VT-D
Fast processors (Think Dual Quad 2.5 min or an e5-26xx hex core)
As much ram as you can afford (32gb+)
LSI (or rebadged IBM) HBA's
(2) SSD's for SAN OS
X of disks for the shared Pool
SSD's for Cache drives if possible
USB Key for Hypervisor

My system fits the bill perfectly.
X8DTE Motherboard
(2)Intel x5650 processors
192GB DDR3 10600 ECC REG
(2) LSI 9211-8i HBA
2 160gb Intel SSD for Open Indiana
4 Crucial M4 256gb SSD cache/log/ect
4 Crucial M4 512gb SSD VM OS drives
2 3TB Seagate 7200rpm Spindle archival drives
16GB HP Thumbdrive for the Hypervisor

The initial setup via Gea's guide is very simple:
1) Load ESXi onto your thumb drive
2) Install OpenIndiana on to a 40gb Datastore on OS SSD1
3) Pass the LSI HBA through to the OI VM
4) Install Napp-It and mirror the OS drives
5) Create a storage pool with the disks passed through the HBA and enable NFS (In my case, RaidZ10)
6) Create a Vswitch in ESXi with a second dedicated NIC for SAN traffic using the vmnet driver
7) Assign static IP's to the new SAN nic in OpenIndiana
8) Add the datastore in ESXi
9) Install vmware tools on OpenIndiana
10) Start benchmarking!

So far I have seen 1100Mb/s Read and 325Mb/s Write. It has been up solid for a month now hosting ~5 test VM's and I can't wait to start loading it down. Next up I will attach a large pool of spindle disks for some Raid Z testing.


Designing a network for a Small-Medium Business

Last year I started on the redesign of my works network. I wish I had read this article first! It condenses all the individual knowledge I gathered online in to a single, easy to understand article.

http://arstechnica.com/business/2010/02/designing-a-highly-reliable-small-medium-business-network/

Friday, January 11, 2013

Installing VMware Tools in OpenIndiana151a fails

I came across this issue today where I could not get VMware tools to install. Thankfully I found this very helpful post: HERE

Make sure to run when you are done.

# /etc/init.d/vmware-tools status
The output is similar to:

vmtoolsd is running

Here is the VM KB article:
http://kb.vmware.com/selfservice/microsites/search.do?language=en_US&cmd=displayKC&externalId=1023956