
Thursday, January 19, 2012
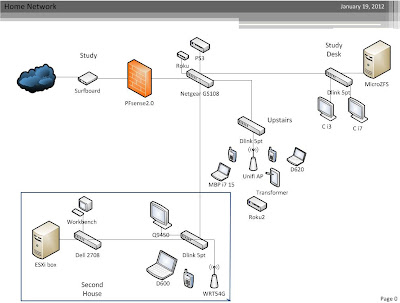
Home network layout.
I have been cleaning up my home network layout and wanted to toss it quickly in to Visio. Check it out below.


Setting up Link Aggregation in Solaris 11
Now that you have built that awesome ZFS box, your going to want to be able to access it as fast as possible right? So you do some research, find out that with a managed switch you can combine physical ports to increase your network speed. Link Aggregation does just this and Solaris has its own method. Now mind you, this is really only beneficial where you have multiple machines trying to access the same server at once. Unless you want to put a quad port nic in your desktop, but that's a whole other project :).
Here is a great guide!
http://blog.allanglesit.com/2011/03/solaris-11-network-configuration-advanced/
Here is a great guide!
http://blog.allanglesit.com/2011/03/solaris-11-network-configuration-advanced/
Mirroring your boot drive in Solaris 11
As part of building a handful of ZFS boxes lately, I have been gathering small helpful tricks or well written guides. Here is another great guide on mirroring your boot drives in Solaris 11.
http://constantin.glez.de/blog/2011/03/how-set-zfs-root-pool-mirror-oracle-solaris-11-express
http://constantin.glez.de/blog/2011/03/how-set-zfs-root-pool-mirror-oracle-solaris-11-express
ZFS SAN Build: Part 1 the hardware
Before putting a ZFS SAN in to production for our new VM environment, I wanted to build a proof of concept server. If you have no idea what ZFS is, where have you been? Check out Sun's offical documentation on it HERE! Or over at Serve the Home
Or over at Hard Forum
Or over at Anandtech
Why ZFS?
- Data security due to real data checksums, no raid-write hole problem, online scrubbing against silent corruption.
- Nearly unlimited datasnaps + systemsnaps and writable clones without initial space consumption due to copy on write.
- Easyness, it just works and is stable without special raid-controller or complex setup.
- It scales to petabyte size with off the shelf hardware.
- It is FREE.
Let me repeat the two most important parts- It is FREE and it just WORKS. You can build and configure a 20TB+ system in a weekend , minimal headaches, and be ready to start enjoying all the great features of ZFS before you could even build a similar Raid 5 array.
When planning the ZFS SAN, I had the following things in mind:
-Reliable hardware
-Off the shelf parts
-Easy to service
Lets start with the chassis:
There are a dozen great chassis which can fit a number of different users requirements. Norco and Supermicro are two great choices. On a budget? Norco. 24 bays for a $300 price range? Can't beat that for home use! Looking for redundancy? Supermicro, you can not built the quality for the price point.
I went with neither. Originally I was going to use the Supermicro 4u 24 bay hot swap. HERE It has redundant 900w or 1200w powersupplies, great build quality, and a price point around $1000 shipped. It was perfect- until I found this monster at a local ewaste recycler:
34bay Hotswap SATA chassis with 4 redundant powersupplies for $200
 It was originally designed for a dual opteron with PCI-X raid controllers. This chassis was around $5k with no drives back in its day. It even worked. It fit every requirement and helped take a significant chunk out of the budget. The one down side? It required custom cables for the backplane- SFF-8470 to SFF-8087. These cost a cool $300... It was weeks after I bought it I found this out, and honestly, I should have bought the supermicro. No one makes rails for this monster anymore either. Lesson 1 learned.
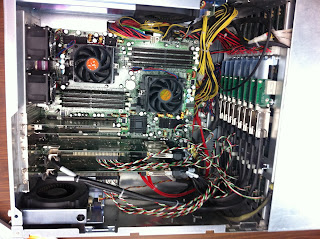

The motherboard, processor, and ram:
I wanted something stable and cheap. I have had great luck with supermicro motherboards. I found this board open box on Newegg for $200 off: Supermicro X8DAH+-F-O. It includes some very nice features like ipmi, dual processors, 256gb ram supported, tons of PCIe 16x, 8x, 4x slots, and nearly half off! It uses cheap, unregistered ecc at around $40 per 4gb stick.
Supermicro X8DAH+-F-O
16gb Kingston DDR3 ECC
(1)Xeon e5420 2.5 Quad


Controller cards:
I wanted to go with LSI from the start and keeping in mind being able to provide the best bandwitdh possible, I chose the following:
Two LSI SAS9201-16i controllers
These two cards use 4x 8087 internal connectors and provide up to 430,000 I/Os per second when connected to the 8x PCIe bus. I choose to use two controllers instead of a expander due to concerns over the single 8087 linking the controller to host.
Hard drives:
2x 250gb WD hard drives (Mirrored rpool)
20 1tb WD RE3 hard drives
2x Intel 320 80gb ZIL drives
2x Intel 320 160gb L2ARC cache drive
Now I know using RE3 drives defeats the purpose of using cheap hard drives, but at $65/e brand new off ebay, these were hard to beat. RE3 are raid class enterprise drives designed for 24x7x365 and have a long proven track record.
The ZIL drives are simply for the ZIL log, setup in a mirror this should create a fast log store, which is important for performance in ZFS.
The L2ARC drives keep the most commonly accessed files and setup in a raid-0, these should provide a super fast store for 320gb of the most accessed data.


Networking:
2x Quad Port Intel Nics
With building this fast of a machine, I wanted to provide a solid connection to the SAN network. Two Quad nics allows me to provide two 4gb's LCAP links to two individual switches. Combined with each servers two dual port gigabit cards, each server has a super fast, redundant back end for storage traffic.
Or over at Hard Forum
Or over at Anandtech
Why ZFS?
- Data security due to real data checksums, no raid-write hole problem, online scrubbing against silent corruption.
- Nearly unlimited datasnaps + systemsnaps and writable clones without initial space consumption due to copy on write.
- Easyness, it just works and is stable without special raid-controller or complex setup.
- It scales to petabyte size with off the shelf hardware.
- It is FREE.
Let me repeat the two most important parts- It is FREE and it just WORKS. You can build and configure a 20TB+ system in a weekend , minimal headaches, and be ready to start enjoying all the great features of ZFS before you could even build a similar Raid 5 array.
When planning the ZFS SAN, I had the following things in mind:
-Reliable hardware
-Off the shelf parts
-Easy to service
Lets start with the chassis:
There are a dozen great chassis which can fit a number of different users requirements. Norco and Supermicro are two great choices. On a budget? Norco. 24 bays for a $300 price range? Can't beat that for home use! Looking for redundancy? Supermicro, you can not built the quality for the price point.
I went with neither. Originally I was going to use the Supermicro 4u 24 bay hot swap. HERE It has redundant 900w or 1200w powersupplies, great build quality, and a price point around $1000 shipped. It was perfect- until I found this monster at a local ewaste recycler:
34bay Hotswap SATA chassis with 4 redundant powersupplies for $200


The motherboard, processor, and ram:
I wanted something stable and cheap. I have had great luck with supermicro motherboards. I found this board open box on Newegg for $200 off: Supermicro X8DAH+-F-O. It includes some very nice features like ipmi, dual processors, 256gb ram supported, tons of PCIe 16x, 8x, 4x slots, and nearly half off! It uses cheap, unregistered ecc at around $40 per 4gb stick.
Supermicro X8DAH+-F-O
16gb Kingston DDR3 ECC
(1)Xeon e5420 2.5 Quad


Controller cards:
I wanted to go with LSI from the start and keeping in mind being able to provide the best bandwitdh possible, I chose the following:
Two LSI SAS9201-16i controllers
These two cards use 4x 8087 internal connectors and provide up to 430,000 I/Os per second when connected to the 8x PCIe bus. I choose to use two controllers instead of a expander due to concerns over the single 8087 linking the controller to host.
Hard drives:
2x 250gb WD hard drives (Mirrored rpool)
20 1tb WD RE3 hard drives
2x Intel 320 80gb ZIL drives
2x Intel 320 160gb L2ARC cache drive
Now I know using RE3 drives defeats the purpose of using cheap hard drives, but at $65/e brand new off ebay, these were hard to beat. RE3 are raid class enterprise drives designed for 24x7x365 and have a long proven track record.
The ZIL drives are simply for the ZIL log, setup in a mirror this should create a fast log store, which is important for performance in ZFS.
The L2ARC drives keep the most commonly accessed files and setup in a raid-0, these should provide a super fast store for 320gb of the most accessed data.


Networking:
2x Quad Port Intel Nics
With building this fast of a machine, I wanted to provide a solid connection to the SAN network. Two Quad nics allows me to provide two 4gb's LCAP links to two individual switches. Combined with each servers two dual port gigabit cards, each server has a super fast, redundant back end for storage traffic.
Wednesday, January 18, 2012
The Network is Failing!
Last summer I was faced with a interesting challenge. My old work brought me back to replace their aging servers which I originally installed in 2006. The old setup was barely keeping up with the business as it grew. Two Dell PE2900's served as the primary SBS2003 and Fileserver. Their primary storage array was comprised of 320gb Western Digital hard drives in a Raid 5. This worked great for about 3 years until the average file size grew over 350mb and the engineering staff doubled. Needless to say they also outgrew SBS2003 and have been painfully living with the now 6yr old install still grinding away.
I had to find a new solution which fit the following criteria:
Powerful
Stable
Expandable
and on a shoe string budget...
I had recently built out a $100k virtual environment for another client and this seemed like quite the challenge. I wanted to give them the same redundancy, performance, and expandability that I have previously found in commercially available solutions.
Step 1: Virtualize it. vSphere 5
I am a big virtualization fan and I can think of no better way to provide a powerful, stable, and expandable environment. As they grow, they can move away from the limitations of the free version and easily setup a HA environment. The hardware is fairly common:
- Two Dell R710's , Dual Quad e5620, SD card, dual powersupplies, 3yr warranty.
- 32gb ram each (upgradable to 256gb each)
- No local storage
- 4 Quad port Intel 1000 nics
Step 2: We need storage! ZFS SAN
I starting working with ZFS just over two years ago after reading about it while researching a home fileserver build. What started in my esxi lab soon moved to a 5tb fileserver to replace my original WHS, and even then I was never able to fully take advantage of the great features of ZFS.
Benifits of ZFS:
-Built by Sun and included in OpenIndiana 151a- the latest release from the Illumos project.
-Software like Raid with no write hole and incredible speeds.
-Very inexpensive to deploy, no special hardware.
-All raid sets supported (though named differently)
-Data encryption, file system level snap shots, and de-duplication.
After seeing the success stories of sites like www.zfsbuild.com and watching Gea's Napp-It web interface evolve, I decided it was worth setting up a test system for a proof of concept. My own personal success with it was a great starting point, but I wanted to really test the speed and redundancy of ZFS. We need stability and redundancy here, as this could easily be a single point of failure.
Step 3: Networking- Tie it all together!
This is where it gets fun. I planned originally on a basic two network design, separating the SAN and LAN network. Due to the projected growth and the ability to easily expand, I decided to add a third. The end design includes a third network, dedicated to management. This allows me to keep the traffic away from the end user, and keep the end user away from my management interfaces. Nothing like having someone find a password list and causing hours of damage for "curiosities sake". (It happens more then any IT person cares to admit.) Plus I now am free to use those spare IP's for more end users. Due to the budget, I went with HP 1800-24g switches. These are a low cost, web managed, gigabit switch that supports vlans, trunking, and LCAP.
Network layout:
- x.x.20.0 Management
- x.x.15.0 LAN
- 10.254.11.0 SAN
Step 4: VPN! Working from home has never been so sweet!
Theoretically this should fall under networking, but I have been super impressed with OpenVPN lately. Years ago I setup a small server to VPN in to my home network. The server crashed, I never rebuilt it, and moved to using other hardware based VPN clients for offices or the SBS included quick connection. This worked ok, but I was never really happy with it. Since they will most likely split to a multiple office setup here soon and I want to co-locate a backup server or two, I needed something slightly more robust which would support IPSEC and Road Warrior style connections. I have ran PFsense at home for a number of years and with the latest 2.0 release, setting up a secure VPN could not be easier.
This is just a very brief overview and I look forward to documenting each step.
Here are some quick pictures of the finished setup:


I had to find a new solution which fit the following criteria:
Powerful
Stable
Expandable
and on a shoe string budget...
I had recently built out a $100k virtual environment for another client and this seemed like quite the challenge. I wanted to give them the same redundancy, performance, and expandability that I have previously found in commercially available solutions.
Step 1: Virtualize it. vSphere 5
I am a big virtualization fan and I can think of no better way to provide a powerful, stable, and expandable environment. As they grow, they can move away from the limitations of the free version and easily setup a HA environment. The hardware is fairly common:
- Two Dell R710's , Dual Quad e5620, SD card, dual powersupplies, 3yr warranty.
- 32gb ram each (upgradable to 256gb each)
- No local storage
- 4 Quad port Intel 1000 nics
Step 2: We need storage! ZFS SAN
I starting working with ZFS just over two years ago after reading about it while researching a home fileserver build. What started in my esxi lab soon moved to a 5tb fileserver to replace my original WHS, and even then I was never able to fully take advantage of the great features of ZFS.
Benifits of ZFS:
-Built by Sun and included in OpenIndiana 151a- the latest release from the Illumos project.
-Software like Raid with no write hole and incredible speeds.
-Very inexpensive to deploy, no special hardware.
-All raid sets supported (though named differently)
-Data encryption, file system level snap shots, and de-duplication.
After seeing the success stories of sites like www.zfsbuild.com and watching Gea's Napp-It web interface evolve, I decided it was worth setting up a test system for a proof of concept. My own personal success with it was a great starting point, but I wanted to really test the speed and redundancy of ZFS. We need stability and redundancy here, as this could easily be a single point of failure.
Step 3: Networking- Tie it all together!
This is where it gets fun. I planned originally on a basic two network design, separating the SAN and LAN network. Due to the projected growth and the ability to easily expand, I decided to add a third. The end design includes a third network, dedicated to management. This allows me to keep the traffic away from the end user, and keep the end user away from my management interfaces. Nothing like having someone find a password list and causing hours of damage for "curiosities sake". (It happens more then any IT person cares to admit.) Plus I now am free to use those spare IP's for more end users. Due to the budget, I went with HP 1800-24g switches. These are a low cost, web managed, gigabit switch that supports vlans, trunking, and LCAP.
Network layout:
- x.x.20.0 Management
- x.x.15.0 LAN
- 10.254.11.0 SAN
Step 4: VPN! Working from home has never been so sweet!
Theoretically this should fall under networking, but I have been super impressed with OpenVPN lately. Years ago I setup a small server to VPN in to my home network. The server crashed, I never rebuilt it, and moved to using other hardware based VPN clients for offices or the SBS included quick connection. This worked ok, but I was never really happy with it. Since they will most likely split to a multiple office setup here soon and I want to co-locate a backup server or two, I needed something slightly more robust which would support IPSEC and Road Warrior style connections. I have ran PFsense at home for a number of years and with the latest 2.0 release, setting up a secure VPN could not be easier.
This is just a very brief overview and I look forward to documenting each step.
Here are some quick pictures of the finished setup:


Tuesday, January 17, 2012
Static IP's and Solaris 11
No matter how many times I setup up static IP's on my Solaris 11 express or Open Indiana 151a installs, I always come across different problems! Almost every guide has you do it differently and I wanted to post what finally worked for me. This is from late last summer, but I found it relevant when trying to resetup my Napp-IT ZFS All-in-one on ESXi tonight.
First up fire up terminal and switch to root.
Next up disable network auto magic:
First up fire up terminal and switch to root.
Next up disable network auto magic:
# svcadm disable nwam
# svcadm enable network/physical:default
Check the physical adapter state and note the LINK name:
# dladm show-phys
LINK         MEDIA                STATE      SPEED  DUPLEX    DEVICE
bge0         Ethernet             unknown    1000   full      bge0
Check the logical adapter state:
# ipadm show-if
IFNAME     STATE    CURRENT      PERSISTENT
lo0        ok       -m-v------46 ---
Create a logical adapter:
# ipadm create-if bge0
# dladm show-link
LINK        CLASS     MTU    STATE    BRIDGE     OVER
bge0        phys      1500   up       --         --
# ipadm show-if
IFNAME     STATE    CURRENT      PERSISTENT
lo0        ok       -m-v------46 ---
bge0       down     bm--------46 -46
Assign the adapter a static ip of 172.16.1.10/16.
#ipadm create-addr -T static -a 172.16.1.10 bge0/v4
# ipadm show-addr
ADDROBJ           TYPE     STATE        ADDR
lo0/v4            static   ok           127.0.0.1/8
bge0/v4           static   ok           172.16.1.10/16
lo0/v6            static   ok           ::1/128
Now verify the existing routing tables:
# netstat -r

Routing Table: IPv4
Destination           Gateway           Flags  Ref     Use     Interface
-------------------- -------------------- ----- ----- ---------- ---------
solaris              solaris              UH        2          0 lo0
172.16.0.0        172.16.1.1      U         3          1 bge0

Routing Table: IPv6
Destination/Mask            Gateway                   Flags Ref   Use    If
--------------------------- --------------------------- ----- --- ------- -----
solaris                     solaris                     UH      2       4 lo0
Add a persitant default route:
# route -p add default 172.16.1.1
add net default: gateway 172.16.1.1
add persistent net default: gateway 172.16.1.1
Now your routing table should look like this:
# netstat -r

Routing Table: IPv4
Destination           Gateway           Flags  Ref     Use     Interface
-------------------- -------------------- ----- ----- ---------- ---------
default              fw01.allanglesit.net UG        2      10466
solaris              solaris              UH        2         12 lo0
172.16.0.0        172.16.1.1      U         6       1810 bge0

Routing Table: IPv6
Destination/Mask            Gateway                   Flags Ref   Use    If
--------------------------- --------------------------- ----- --- ------- -----
solaris                     solaris                     UH      2     156 lo0
Go ahead and check your resolv.conf:
# cat /etc/resolv.conf
domain  allanglesit.net
nameserver  172.16.1.1
# dig www.google.com
Now reboot and enjoy your new static IP :)
This has been modified from a guide here: LINK
Monday, January 2, 2012
Busy! Removing default password complexity policy in Server 2008R2
Wow it's January. 2011 flew by. It seems like 2011 was just one project after another! Things around our house have kept me super busy, with the holidays and all- but I really need to spend some time to update this blog with my ZFS fileserver builds.
Quick note: Ever built a small test environment and wanted to disable the annoying password complexity requirements/age in server 2008R2? Here is how:
When setting up a new Windows Server 2008 server either with or without Active Directory you will discover that it has a rather strong policy for passwords. If you are setting this up at home or in a small business environment and don't want to deal with the complex passwords that are required to meet the policy guidelines, you can edit the policy to disable the complexity requirements. You can try going to a command prompt and typing 'gpedit.msc' then navigating to Computer Settings\Windows Settings\Security Settings\Account Policies\Password Policy\ section.
Here you will see the 'Password must meet complexity requirements' item. When viewing the properties of it, usually the Enabled/Disabled radio buttons will be grayed out and you cannot change the values. If they are able to be changed, go ahead and do it, and save out of the dialog boxes. If it is grayed out and you cannot change it here, this is how you do it:
Quick note: Ever built a small test environment and wanted to disable the annoying password complexity requirements/age in server 2008R2? Here is how:
When setting up a new Windows Server 2008 server either with or without Active Directory you will discover that it has a rather strong policy for passwords. If you are setting this up at home or in a small business environment and don't want to deal with the complex passwords that are required to meet the policy guidelines, you can edit the policy to disable the complexity requirements. You can try going to a command prompt and typing 'gpedit.msc' then navigating to Computer Settings\Windows Settings\Security Settings\Account Policies\Password Policy\ section.
Here you will see the 'Password must meet complexity requirements' item. When viewing the properties of it, usually the Enabled/Disabled radio buttons will be grayed out and you cannot change the values. If they are able to be changed, go ahead and do it, and save out of the dialog boxes. If it is grayed out and you cannot change it here, this is how you do it:
- Go to a command prompt
- Type 'secedit /export /cfg c:\local.cfg' and hit enter
- Using notepad, edit c:\local.cfg
- Look for the line "PasswordComplexity = 1" and change it to "PasswordComplexity = 0"
- You can also edit "MinimumPasswordLength = 7" to a lesser value if you like.
- Save the file
- At a command prompt type 'secedit /configure /db %windir%\security\local.sdb /cfg c:\local.cfg /areas SECURITYPOLICY
- This will apply the new settings and refreshing the gpedit.msc should reflect the new settings
- Set your new less complex password!
Subscribe to:
Posts (Atom)